Janome HQ and my Engineering Degree!

21 Jul

A few months ago an email popped into my inbox from Janome(who make and sell our lovely Elna Machines). It wasn’t an invoice so I was very interested! It was an invitation to visit their Head Office and learn how to take the machines and overlockers apart and put them back together again. Having taken my own machine apart A LITTLE BIT in the past to free a poor wee trapped thread or two I jumped at the chance of doing it properly.

I set off from Glasgow at 6am to get to Stockport at 9.30. It was a gorgeous drive, the sun was out and I listened to about 25 Desert Island Discs(brilliant podcasts for long drives!).

Arrived at Janome amazed that Google Maps had actually got me there first time without suggesting I take a left into a field or something. The class is small with only 4 of us on there. 2 girls and 2 guys. Everyone is from a company in England. I wonder if they do that on purpose so you’re not sitting next to your biggest competitor?

Peter from Janome is taking the class. We started by taking apart a front loading machine a bit like the Elna 240 we sell.

Elna 240

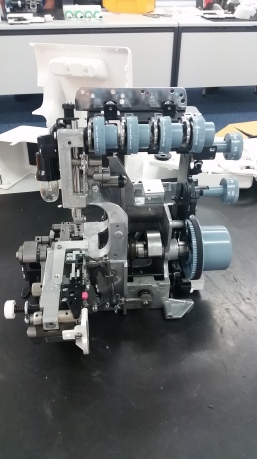
Below is the naked version!
20150715_103033

I actually couldn’t believe how complex it all was! I was expecting to find this easier than I did. I thought because I am a logical thinker and use sewing machines every day that I would be sitting there having loads of light bulb moments. In reality it was very confusing. I even found the terms for all the bits confusing. As much as I am quite handy around the house DIY wise I have never dealt with anything mechanical. I don’t even take plugs apart. I already have curly hair, god knows what an electric shock would do to it but I’m not interested in finding out!

As we were chatting away I was getting to know the other people on the course. We had David who was already clued up on sewing machine mechanics, Steven who had just started a business with his wife and Joy who worked for a company down south and like me had no experience of repairing or servicing machines.

I was interested to find out what brands David would avoid quality wise. He knows all the brands, right up to the industrial ones so he must know what ones come back in for repair a lot. The first brand he said to avoid was Singer. Not surprised here as I am always urging people to avoid Singer, doesn’t matter what kind of deal you think you are getting they are terrible! The second brand he mentioned which came as a shock to me was Brother. Exactly the same quality as singer apparently!! So there you go AVOID SINGER AND BROTHER!

When you open up the Elna and Janome machines they are heavy with mostly metal bodies(there you do I’ve20150716_085044 forgotton the technical terms already). You can see all the metal in the picture above. All the parts and the plastic covers are screwed into this solid metal body to keep everything in place. In the cheap machines most of the body is plastic, and plastic breaks and then bits fall off. I know now using my first class engineering degree that bits falling off and breaking off inside a machine is a bit of an issue. The only way to avoid it is to avoid the cheap crap brands. You all know the story of me dropping one of my Elna 340s out the back of my old 4×4 about 2 and a half foot up? Well it still works. I don’t even know what one it was. THAT is quality right there!

I drank a lot of tea over the two days. No surprises there.

We took apart a top loading machine as well, like our trusty 340s. Just as insanely complicated as the front loaders!

The following day we were onto computerised machines. It’s common to think that the mechanical ones are easier to fix because they have no complex computerised bits inside but this was actually so much simpler!

20150716_102428 20150716_102501 20150716_102952

20150716_103233My Dad started off his working life as a TV engineer. I can actually remember going to houses of family friends for him to fix them. He would get me to hold things like screwdrivers and soldering irons(!!!!). I must have been about 7. Who gives a 7 year old a soldering iron?! That’s my Dad for you. Anyway he said to me when I was on this course that I had engineer genes from him. But my greatest memories of my Dad fixing things was him turning them off, turning them upside down, giving them a good shake then putting them on again. He refers to this as an ‘Australian Reboot’ which had me in knots. He actually fixed our PC one year by doing this. It went from not turning on to working fine for another few years. There must be something in it!

This was a Janome Embroidery machine. Once I put it back together we had to test it and fiddle about with some setting to make sure they worked. Well that was a terrible idea because now I am DYING for an all singing all dancing embroidery machine. What an absolute dream!

20150716_104551

I did manage to put this together again with  lot of help. Even just remembering what screw went where was a nightmare!

Then we moved onto overlockers, I LOVE OVERLOCKERS! I don’t think they are a nightmare to thread at all. Once you have been shown it’s really not a big deal and they can help you make the most amazing professional garments out of stretch or non stretch fabric. So this machine is the equivalent of the Elna 664. I’m just about to buy 4 and start running classes. Join the mailing list here to be kept up to date!

Elna 664

20150716_122254

20150716_123549

These bad boys aren’t as complicated as you would think. Don’t ask me to take it apart and put it back together again right enough!

I thought this course was great. It was nice to visit the Head Office and meet some people I have only ever spoken to on the phone. Peter knows these machines absolutely inside out. He helped us take them into a million bits and then knew how to put them back together again by memory. A true expert!

I think I will be leaving the repairing to the experts but I do feel that I could diagnose a problem now, and probably fixing timing issues. I might even have a go at replacing a wee part or two but only on my own machines.

Here is my engineering degree I was talking about! Haha! I’ll get that right on my CV!

20150716_150701

DIY Teabags and Sweet Treats from The Chefs Larder

11 Feb

For my second Valentines project I enlisted the help of my Chef friend Andy from The Chefs Larder. I was again trying to think of things that can suit men and women and everyone likes tea and biscuits. The green element of this is green tea. Only joking! The idea is you can use some bits and bobs you will have lying about to make something super cute for your loved one. Here goes.


You Will Need:

Coffee filter papers
Loose leaf tea
Sewing machine or needle and thread
Paper and a Pencil


1. Firstly we need to make ourselves a heart shaped stencil. I folded a piece of paper in half and drew half a heart shape then cut it out. This makes it symmetrical and is a really easy way to draw a love heart shape.
DIY Teabag Tutorial 20150206_131046

2. Now you can use this stencil to cut out 2 heart shaped pieces of coffee filter paper.

20150206_131221

3. If you have embroidery thread in a nice colour kicking about then you can use it later but if you don’t you can use 4 bits of bog standard sewing thread. It’s essentially the same thing. Cut 4 pieces the same length and twirl them until it looks like one chunky piece of thread. Put it to the side for later.

20150206_131414

4. Using your sewing machine or by hand, stitch the two heart pieces together leaving a space at the top open.

20150206_132314

5. Fill your teabag with loose leaf tea(not too much or you won’t be able to close it!). I am really big on tea, I have a drawer full of it but I think my favourite is black tea and rose(or black tea and violet but it is even harder to get a hold of!). I have this Whittards loose leaf that I am going to use for my tea bag!

20150206_132420 20150206_132536

6. Stitch the teabag closed remembering to insert the thread we twisted earlier and your teabag is ready for it’s little biscuit pal!

If you would like to buy this kind of thing in bulk(they make thee cutest favours) you can contact Tea by Lita and she can sort you out with the most amazing tea blends and personalised tea bags!

20150206_132829

For the Biscuit!

Viennese whirl biscuit.

190g soft butter
75g icing sugar
1/2 vanilla pod
Pinch of salt
35g egg white
225g plain flour

Preheat the oven to 160*c. Place the butter into a mixer and beat well with a paddle or use your hands and a wooden spoon. Beat until pale and light. Add in the icing sugar, salt, egg white & vanilla and mix until fully incorporated. Slowly fold in the plain flour. Place a star nozzle into a piping bag and pipe onto grease proof paper any shape you desire. Bake for 20 minutes at 160*c and leave to cool on a wire rack.

Alternatively, you can dip them in chocolate or dust with icing sugar or even a little cinnamon sugar.

Make sure you check out Andy’s blog for loads more amazing recipes and photographs of delicious things!  http://thechefslarder.blogspot.co.uk/


Enjoy!!

20150208_151444

Roses are Green, So Are Violets!

10 Feb

Recently Alex who is involved in the Scottish Governments Greener Together campaign asked if I could come up with some hints, tricks and tutorials for a greener Valentines Day.  Obviously I said absolutely and then made myself a cup of tea and set my brain to work(and my Facebook, nothing like crowdsourcing for ideas!).

So the whole premise of greener together is to Reduce, Reuse and Recycle to make Scotland a greener place to live and to reduce our impact on the environment further afield too. It makes sense really, and it’s just a change in attitude and seeing a use in some things that you wouldn’t normally. I have a cupboard full of glass jars I use as glasses and they actually look great and it means I don’t have to ever buy any!

The first thing I came up with and the best present anyone can ever give anyone else is a sewing class obviously. The gift that keeps on giving! A skill you can utilise to make the best of your home and wardrobe and become an excellent green upcycler! You can find classes for men and women on the website here and you can also buy gift vouchers too. Once you have learned the basics you can move onto my next super green Valentines Gift idea…


An Apron!

Inspired by my classes who in their final week have the option of their own project. So many of them choose an apron, either for themselves of for a gift. The great thing about this is it’s useful and perfect for ladies or men. It can also be as simple or as difficult as you like. You can add patch pockets and frills or keep it nice and simple. Here is a tutorial for a nice simple one. I suggest using an old curtain as the fabric. These are a great plentiful source of fabric and often when we take down our old curtains we don’t know what to do with them so just stick them in a cupboard! Time to get them out and put them to good use! It might even inspire your other half to cook you a beautiful meal!


You will need:

Curtain
Some spare ribbon, from Christmas pressies perhaps!
Set square
Chalk
Scissors
Sewing machine
Measuring tape
Thread

There is no paper pattern for this. I encourage my students to get used to using a set square because it opens up a world of possibilities. You can thik of something you want to make in your head and then make it happen without having to search the internet for a pattern. The set square ensure you get your angles right. If you don’t have one I suggest getting yourself one they are incredibly useful and will last forever.

The first thing I did was take some measurements. If you are making this for someone else just use you own measurements and adjust them roughly to make the apron longer or shorter. Measure from where you want the apron to start (just below your collarbone) to where you want it to end. My measurement for this is 75cm + seam allowance(4cm). Fold your fabric in half right sides together (so we are chalking on our wrong side) and mark this measurement down the fold.

Now measure from just below your collarbone to your waist/bellybutton. Using your set square measure down and square across where the dotted line is below. Measure what you would want the total width of your apron to be at the bottom. I went for 45cm. Half this and add seam allowance(this time 2cm). For the top part do the same. Now you can chalk the shape below on your fabric.  The curved bit can be drawn freeland, or you can draw a straight line. Don’t make it too curved because it makes it difficult to hem later.

apron plan-01

2. Now cut out your apron shape.

Sewing Classes Scotland

3. Fold down your top edge by 1cm then fold down again by 1cm to enclose all raw edges. Pin in place.

Sew Confident Green Apron
4. Before you sew enclose your neck ribbon. Leave a space of 2cm from the side(I forgot to do this in the photos). This will allow you to turn in the side seams in a similar way you have turned down the top part. Pin and sew.

20150206_140848 20150206_140901 20150206_140923 Green Apron Sew Confident


5. Now turn in and stitch the curved side seam and the straight side seam. This time we are not enclosing any ribbon.

Green ApronGreen Apron Sew Confident

6. For my side ties I had enough ribbon to stitch one continuous piece across the front to create my ties. If you don’t have enough to can enclose them in the same way we enclosed the neck tie. Here I pinned my ribbon in place and stitched the top and bottom to secure it.

20150206_143252 Green Apron Sew Confident

Finally hem your bottom edge by turned it in by 1cm, twice and you have yourself a super green upcycled apron!


Elsa From Frozen Dress Tutorial [Part 2]

29 Oct

So how are we doing? Our lining is in and the sheer top of the bodice is in too so now we are onto the sleeves!

With right sides together sew down the inside seam of the sleeve. The fabric I am using doesn’t fray. So I’m not hemming the bottom of my sleeve because a) this is a halloween costume and b) it actually looks better without a hem. I have however used bias binding around the neckline because we nee to sew a button and a loop onto this and my fabric is so sheer and stretchy it needs some stabilising to take a button. If you have bought sheer fabric that is fraying like mad you will have to zig zag the raw edge and hem it to stop it turning into a short sleeve version after one wear!20140929_160211
It also tell you to ease stitching the head of the sleeve. My sheer fabric is stretchy so I don’t have to do this. Remember ease stitching is just the same as gathering and it helps you fit the sleeve into the armhole should you need the sleeve to be a little bit smaller. So now with right sides together pin your sleeve in place matching your notches on either side. Stitch in place. It should look like this now.

20140929_163358

If you haven’t done this already we need to secure the capey bit to the back of the dress at the zip. This requires you to fold under about 1cm of the cape and pin it next to the zip closure as illustrated below(I know you can hardly see my pins here!). Don’t pin it too close to the zip incase it catches in the zip. Now stitch this in place down the entire length of both sides of the zip.Elsa Dress

All that is left to do now is hem the bottom, sew a wee button or hook and eye onto the back neck and applique any decorations.

The instructions do not make it very clear how to make the button loops so I have made a video to help you. It’s quite a useful skill to have and it makes a lovely elegant little button closure.

You could use fusible web(a bit like wundaweb) to stick the snowflakes onto the dress if you didn’t want to stitch them. You could also go wild and sew beads and other sparkley bits and bobs on there if you wanted! Depends how much time you have!

I am sending the finished article to my little cousin and I will post a photo of her wearing it asap. Please send me you photos of your Elsa dresses!

As always any questions please give me a shout!

The Launch of Sew Macho and My Very Witty Friends

14 Oct

So yesterday I had set aside the entire day to develop my new sewing class for men. I get asked by male friends and family members to fix things and take things up and I thought it would really save me some time if they just did it themselves haha! I have also in the past had a fair few men come to and enquire about the classes but a room full of women can be a little intimidating for a man. Also my beginners class is geared towards ladies, with things like a Make-up bag and bunting. It was clear I had to make an entirely different class catering for guys. After a bit of research(read asking every boy I know) I figured guys want to hem thing, fix things and maybe alter things so that is exactly what we will be doing to start with anyway!

The class will be a 3 hour session, probably in a nice pub in the west end(I’m currently talking to a few venues). It will be an evening class from 6-9pm. Th first hour or so we will go through all the machine basics, threading, different stitches, how the actual machine works. then we will move onto hemming, so you can take your jeans up. How to measure them and cut them. How to hem accurately etc. Then we will move onto fixing holes and rips with patches. I know so many men who wander about with rips in their jeans, particularly in the crotch, but they love those jeans, and they sit nice(apart from the giant hole) so they keep wearing them. I will help you fix them! Upon booking everyone will be sent an emailing advising them of what they can bring along to be fixed. If you didn’t have anything I will have scraps of fabric we can work on so don’t worry about that. I hope to have this class sorted end of this week, start of next. If you want to be the first to know you can join the mailing list or like the Facebook

Anyway back to my day of hilarity yesterday – My first problem was finding a name. I wanted to create a brand that was masculine and a bit of a laugh. All my Sew Confident branding is very girly and pink so it had to be the opposite of that. I took to Facebook to ask for some witty and masculine sewing related puns and I can honestly say I spent all of yesterday laughing. I am blessed with a lot of very witty friends and they did not disappoint. I warn you some of the ideas are a bit rude so maybe stop reading now if you are easily offended. I just had to share these with you.

Sew Macho Sewing Classes For Men

Sew Macho Sewing Classes For The Modern Man


First up my good friend Gary Thermo. He was one of the first people I messaged because he is hand down one of the funniest people I know he came up with Sew Macho, An Earnest Hemming Way, and Thread Flintstone. I can’t tell you how much I laughed at Thread Flintstone and I ended up using Sew Macho as the name for the new class. I also got Sew Manly from my genuine stand up comedian friend Rosco and I nearly went with that but Macho won in the end!

Some more from Facebook:

Say it ain’t sew – Sadly this is already a hand sewing class in Glasgow but it is a belter!
SewperMan
Stitches n ho’s – The tiny feminist in me will never use the word ‘Ho’ unless it’s followed by another two ‘Ho’s and is relating to Christmas but it’s still a good one!
Bunch of pricks – Such a good name, just too offensive for print!
The “Wadding” “Singer”
You’ve been tapestry’d, hosted by Jeremy Needle – JEREMY NEEDLE! Oh how I laughed.
Hairy Bobbins
I got 99 problems but a stitch ain’t 1 – My good friend Alissa, who I went to uni with really hit it out the park with this one. Good work, I used it as my tagline.
Pulp Stichin’ / True Sewmance
Sew you think you’re a man?
Needle dicks – Unsurprisingly from one of the most offensive people I know, still offending people all the way from New York, Chris Myler :p
TESTOSEWON – a wee play on testoterone
Jennys Sewldiers – This one is from my mum and probably won’t mean much to anyone. I’m not trying to build an army of sewing men to work in a handsome sweatshop(although that is a good idea now that I’ve written it down), but I have 20 sewing machines now and they are always all lined up at the door ‘like soldiers’ so that is where that comes from.
Sew Amusing
Lucky Sew n Sew
SEWspicious Minds
SEWcial Butterfly
Sews Yer Maw 
Guys – Make Ties
Men and (sewing) Machines
And Sew to Thread
Scissor Brothers
Right Said ThreadThese are all brilliant.

I also woke up this morning to a text sent at 2.19am from a friend of mine I met when I was a standby in an(admittedly chronic) Gameshow The Lie. Kev is hilarious and was only up at this time because he is filming for Countdown today and he was up swotting for that, reading the dictionary or something. How do you even swot for Countdown? Anyway in an excellent display of absolute procrastination he came up with:

Sewperstar
DJ Sewmy’s Boys of Sewmore
Thread raw
Christiano Sewnaldo/Ronaldsew
Threddy Sheringham

So thanks so much to everyone who joined in and inspired me. Looking forward to teaching a brand new breed of modern dapper men how to take control of their own wardrobe!

Sew Macho Sewing Classes for me

Sew Macho Sewing Classes for me

Elsa from Frozen Dress Tutorial [PART 1]

7 Oct

I must admit that I still haven’t seen Frozen. I don’t have many kids in the family, hardly any of my friends have kids so I’m very rarely subjected to kids movies (although I hear it is quite good even if you are an adult!). Anyway I love a princess dress so I couldn’t resist but make an Elsa from Frozen dress. It’s been so popular that there must be plenty of parents out there thinking of making a dress for Halloween so here is a step by step tutorial that should help you make your little princess the perfect Halloween costume.

The first part asks you yo reinforce the inner corner of the bodice front. A couple of wee stitches will do this. This is necessary as it’s a weak point in the dress and might pull and split with time.

Next it wants you to attach all the bodice pieces like so.

Elsa Dress Tutorial

Then reinforce the same point in the skirt with a few stitches for the same reason as above.

20140926_132148

Stitch skirt back sections together, leaving open above large circles. I have been overlocking as I go because this fabric is fraying really badly. If yours is too you can use a zig zag stitch on the raw edge to stop it fraying.

20140926_132227

Now attach skirt front to skirt back at side seams.

20140926_132936

Now it asks you to ‘Ease Stitch’ upper edge of skirt. This is sometimes used in sleeves to gather them every so slightly to fir into arm holes. Its basically the same as gathering if you have ever done that. Two rows of parallel stitching, within the seam allowance. It must be a stitch length 4(or the longest your have) and you don’t do any back tacking at the start or at the end of the stitches. I atually didn’t need to ease this in, it fitted perfectly anyway!

20140926_133206

Now attached bodice to skirt!

20140926_135039

Now it’s time for the zip. They have a diagram showing you how to put in a zip in with stitching visible on the outside. That’s not really my thing and defeats the point of the invisible zip I’m putting in this dress. You can do it whatever way you like.

20140926_135133

Stitch one side at a time with the zip open. Once you have sewn once side of the zip in pin the other side in and then close the zip to make sure everything is aligned with the zip shut. The seam where the bodice meets the skirt should be aligned and the top of the dress should be sligned with the zip shut. It is very easy to sew a zip in squinty so take some extra time at this part to get it right. You might have to pin it a few times before you get it right.

20140926_135138

And the invisible zip is in, with everything lining up.

20140926_140149

Now time to stitch your overlay together(this is the cape-y bit). Stitch the centre back together from the dot downwards and the side seams together. It also asks you to create a narrow hem in the centre back seam from the dot upwards. This part of the overlay will be sewn in next to the zip later. now pin the overlay to the dress with the right side of the bodice to the wrong side of the overlay. It asks you to baste in place. Basting is like a tacking stitch you do on a machine. Remember back to Home Economics when you spend half your like HAND TACKING things? My God, how dull. They didn’t want us to know you can do it on a machine. It’s just a long straight stitch(stitch length 4). It’s a temporary stitch so no back tacking either.

20140926_161012


Video for help!

Now onto the yoke. stitch the yoke front and yoke back pieces together at the shoulder seams.

20140926_161623

It starts to get a wee bit confusing now. It wants you to pin the yoke front to the bodice right sides together. You should have the bodice right sides up, with the overlay ontop right sides up and the the yoke right sides DOWN. Like a little overlay sandwich! Stitch that in place through all 3 layers.

20140926_161950

It will look like this before you stitch it.

20140926_162007 20140926_162826

Now stitch the back of the yoke to the back of the bodice in the same way. Then make up the bodice lining in the same way you made up the outer bodice. The bodice lining is now stitched on in the same way that the yoke was stitched on. You can pretty much got through the same stitches again. To make this a bit clearer you will have the bodice right sides UP, the overlay right sides UP the yoke right sides DOWN and then the lining right sides DOWN. You are stitching along the front bodice and the back bodice where you stitched the yoke on. Don’t stitch in the wee arm holes yet.

20140926_164631


Here is a wee video to help.

All that is left is the sleeves, hems and decoration. Part 2 is HERE

Any questions please ask away and I’ll help you out.

Incredibly Cute 121s!

30 Sep

I love a wee 121 session with someone who is perhaps struggling with a particular project or wants to learn how to put in a zip or use a new machine. I have had a few of these over the past two weeks and they’ve been incredibly cute. The first one was a princess dress for an 11th Month old called Nessa. Her Mum Fran had learned to sew at one of my classes about a year ago and wanted a bit of a helping hand with patterns. Everyone knows I love making Halloween costumes so I throughly enjoyed myself. Annoyingly I didn’t take any photos because I was far too engrossed but I’ll ask Fran if she can send me some when it is done. it’s going to be adorable!

Another very cute 121 i’ve had recently was with a girl I used to work with in The Life Craft, you might know her as Diane from Busy Bees! She was up in Glasgow visiting family and wanted to spend a few hours getting to grips with jersey cotton. I have been using a lot of jersey cotton recently and it is fast becoming my favorite fabric to work with but it can be tricky. Diane brought her own machine, and Elna 220 and we used the ‘super stretch stitch’ on there.

Dianes little jersey leggings

Not a tuck or pleat in sight on this tiny leg hole!


20140929_122041

No need to protect the raw edges as jersey cotton doesn’t fray!

20140929_123016How adorable are these? These little leggings are for her 10 month old son Calib (I hope that is the correct spelling). Aren’t they just gorgeous!?

Diane loves jersey cotton and by the sounds of it she has an extensive stash of cute prints in the house. I introduced her to the overlocker as it really does make jersey and other stretch fabrics and absolute dream. Maybe Santa will be good to her this year and get her one for Christmas!

————————————————-

If you are struggling with something at home and need a hand Jenny can come to you or we can meet in Isew2 in Kirkintilloch. This could be useful for Halloween costumes, curtains, dressmaking or revamping old clothes! If you are interested get in touch here 


How to Thread Your Elna eXplore 340!

29 Sep

Magena Jumper and Sewing Snobbery

22 Sep

When I first started teaching I was quite young at 23. Fairly fresh out of University(about a year graduated) I was also a bit of a sewing snob. My first issue was I could not get on board with the word craft. Craft to me totally belittled the skill involved in sewing. For me it carried connotations of fiddling about with some glitter glue and not making anything productive when I know it to be an incredibly useful skill. I soon realised that it was definitely me getting the wrong end of the crafty stick and I chilled out about it. The second instance of sewing snobbery was about using patterns. For years I would only use patterns if I was against the clock and didn’t have time to make my own. Even then I would alter them, or buy two and amalgamate them. This was a definite case of sewing snobbery. Why draft your own when you can buy great patterns in every style ever(albeit requiring a bit of the imagination on the 80’s style photographs)? I don’t make clothes to sell, only really for myself now so it never made sense to draft absolutely everything from scratch, but I still did it!

This is quite a recent breakthrough for me. I suppose it is fueled by all the amazing funky pattern companies who are making really cool patterns, with nice photographs and in PDF format. I found myself on the Named Patterns website recently. I instantly fell in love with the Magenda jumper and next thing I know I had bought it in PDF format. Autumn is almost here so I thought it would be a cute jumper to wear to class. I had great fun picking the fabric and the bobbly bits. I’m loving working with jersey cotton just now. The overlocker makes jersey the easiest fabric to work with. Previously I have said to people, only buy an overlocker if you are thinking of going into business but now I would say if you like jersey cotton get an overlocker.

Named Clothing Magena Jumper

Named Clothing Magena Jumper

So here is the Jumper from the Named Clothing website. The grey and black doesn’t really do it for me but I could see the potential. I do however love the fringing. Need to get myself some of that!

First impressions, the instructions look pretty concise. I won’t lie I didn’t read the first few pages but it would be very useful for beginners because it tells you things like how to measure yourself, prewashing(sorry what?), how to print the pattern, pattern sheet assembly, tracing the pieces(ain’t nobody got time for that) and basic vocabulary. I printed all my pieces off ans stuck them all together. The first thing that annoyed me was there was a pattern piece printed across all the other pattern pieces so I WAS going to have to trace that piece right enough. It is a pretty big piece(the yoke) so I do understand why they have done it but it’s a bit annoying!

Before cutting it gives you a layplan and a list of what pieces should be cut from what fabric. I decided to use my yoke fabric for the cuffs and hemline panel so you can switch these about if you wish.

Sew Back sleeves to back piece. A super easy way of putting in sleeves. I used an overlocker for most of the sewing but you can use a straight stretch stitch on your normal sewing machine too.

20140919_141626

You then do exactly the same with the front sleeves and the front piece. the front and back pieces look very very similar so I would make sure you don’t mix them up or it will make attaching the yoke difficult.

Now you need to sew the two yoke pieces together to form the neckline. It also tell you to see any fringing/bobbly bits onto the yoke at this point. I stitched mine to my front piece instead, because I’m contrary and a bit of a rebel really…

Magena Jumper 20140919_144831

Now it asks you to pin and sew the yoke to the front piece. Just be careful you don’t sew the back of the yoke to the front of the jumper. I had my pattern piece out just to make sure I had it the right way round.

20140919_145812

Then repeat this step with the back pieces and the back of the yoke.

20140919_150812

Now you are sticthing the sleeves and side seams together in one go. This truly is the easiest sleeve you will ever insert.

20140919_151446

Cuffs now! With right sides together stitch your cuff pieces into a band.

20140919_153052

Fold the band over until the raw edges match. You might want to stitch the cuff together at this point to keep it in place.

20140919_153105

Now matching the raw edges of the cuff and the raw edge of the sleeve stretch the cuff and pin in place. The cuff is intentionally smaller than the end of the sleeve so you will have to stretch the cuff to pin and sew it. Wee bit tricky but just take your time.

20140919_153143

Sorry about this blurry photo!

20140919_153559

TA DAH! Now do exactly the same on the other cuff and on the hemline band and you are done!

20140919_153611 20140919_155746


I thought the instructions on this Named Pattern were very user friendly. I would definitely reccommend them for beginners.


Laser Cut Bomber

9 Jun

These little bomber jackets are all over the place just now. So I decided to make one. You might recognise the laser cut fabric from my last blog. I love this stuff, and I love polka dots and I currently love mint(I just ordered some mint specs the other day – wild I know).

I drafted this pattern using my own measurements. It’s a loose fitting style for jersey sportswear so it’s really comfy. I toyed with putting buttons or hooks and eyes down the front but then I would have to insert a lining or a facing(ain’t nobody got time for that!) so I opted for a chunky plastic black zip.

Raglan Laser Cut Bomber

This is the perfect little summer cover up I think! The sleeves are full length, I just always roll them up.

DSCN0832DSCN0831This is my ‘Look the zip works’ stance.